A Guide to Glycolic Acid Peel at Home
- Web Dev
- Nov 4, 2025
- 14 min read

Ever dreamed of revealing smoother, more radiant skin without leaving your house? An at-home glycolic acid peel might just be the skincare ritual you’ve been searching for. Think of it as your secret weapon for achieving professional-level results, safely and on your own terms. It’s a wonderfully empowering way to take charge of your skincare and let your best complexion shine through.
Your Journey to Glowing Skin Begins Here
The phrase 'chemical peel' can sound a bit intimidating, I completely get it. But let's reframe that. Instead of a harsh procedure, imagine it as a powerful reset button for your skin. My goal here is to be your personal guide, giving you the confidence to unlock that undeniable glow by addressing your concerns and setting you up for success from the very start.
This isn't about chasing an overnight miracle. It's about committing to a steady, rewarding journey towards healthier, more vibrant skin. When you do it right, a glycolic acid peel at home can truly make a beautiful difference.
What to Realistically Expect
Think of this as building a long-term relationship with your skin, not a quick fix. With consistent, careful application, here’s what you can genuinely look forward to seeing in the mirror:
A smoother texture: Glycolic acid is brilliant at dissolving the 'glue' holding dead skin cells together. The result? That feeling of fresh, baby-soft skin underneath.
Brighter, more even tone: It’s a game-changer for fading those frustrating sun spots, old acne marks, and that general lack of lustre that can make your skin look tired.
Softened fine lines: By encouraging fresh new cells to come to the surface, it can make those little lines around your eyes and mouth appear less noticeable over time.
This growing trust in at-home treatments is something we're seeing all across the UK. In fact, clinical studies have shown that regular use of glycolic acid peels at concentrations between 5–10% can improve skin texture by up to 30% over 12 weeks. It’s no wonder so many of us are feeling empowered to get great results from our own bathroom.
The secret to a successful at-home peel isn't about grabbing the strongest product off the shelf. It’s all about consistency, proper prep, and, most importantly, listening closely to what your skin is telling you. It's your best guide.
To get started on the right foot, dive into our comprehensive guide to a glycolic acid peel at home. It lays out everything you need to know for a safe and truly effective experience.
Choosing Your Perfect At-Home Glycolic Peel
Finding the right peel is your first, most empowering step. I know the wall of percentages and ingredients can feel overwhelming, but I promise it's simpler than it looks. This is all about matching a product's power to your unique skin and confidence level, ensuring your glycolic acid peel at home is both safe and wonderfully effective.
Think of it like choosing a workout intensity. You wouldn’t jump into a marathon without training first, right? It's the same with glycolic acid. Starting low and slow is your secret to building your skin's tolerance and achieving that beautiful, lasting glow without any drama.
Understanding Glycolic Acid Percentages
The percentage on the bottle is the most direct indicator of a peel's strength. But here's the reality: it's not about grabbing the highest number you can find. It’s about finding the right one for your skin right now. A lower concentration used consistently will always give you better, safer results than an overly strong peel that you can only tolerate once in a blue moon.
Let's break down what those numbers really mean for you:
Under 10%: This is your ideal starting block, especially if you're new to peels or have sensitive skin. Think of these as your gentle introduction to chemical exfoliation, helping to brighten and smooth your complexion with minimal risk.
10% to 20%: Welcome to the intermediate level. If you've used acids before and your skin handles them well, this range can deliver more noticeable results for texture and pigmentation. It’s the perfect step up when you feel comfortable and ready for more.
Over 20%: This is advanced territory. You should only consider peels at this strength if you're an experienced acid user who really understands your skin's limits. They demand careful application and a much shorter time on the skin.
This growing desire to perform a glycolic acid peel at home is part of a much bigger shift in beauty. More of us in the UK are choosing at-home treatments for their convenience and affordability. In fact, the UK market for these products is set to grow by 11.4% each year between 2025 and 2030, with sales projected to jump from around £42 million to over £72 million. It's clear that taking control of our skincare is a trend that's here to stay.
Glycolic Acid Strength Guide For Your Skin Type
To make choosing even easier, I’ve put together a quick guide. Think of this as your cheat sheet for finding the perfect starting point based on your skin type and experience level.
Concentration Range | Best For | Frequency | Expected Sensation |
|---|---|---|---|
5% - 10% | Beginners, sensitive skin, or first-time peel users | 1-2 times per week | Mild tingling, a slight 'itchy' feeling |
10% - 20% | Intermediate users, normal or combination skin | Once a week or fortnightly | Noticeable tingling, warmth, and some pinkness |
20% - 30% | Experienced users, resilient or oily/acne-prone skin | Every 2-4 weeks | Strong stinging sensation, definite redness post-peel |
Above 30% | Professional use only. Not recommended for at-home use. | N/A | Potentially very painful with high risk of burns |
Remember, this is just a guide. Your skin is unique. Always, always listen to it and patch test first. It’s your best indicator of what it can handle.
Beyond the Percentage: What Else to Look For
The percentage is just one part of the story. A truly well-formulated peel will often include other ingredients that support your skin, making the whole experience more effective and comfortable. When you're reading labels, keep an eye out for these powerhouse additions.
Soothing agents like aloe vera, chamomile, or green tea extract are your skin's best friends, helping to calm it during the peel. I also love to see hydrators like hyaluronic acid or glycerin, as they help to counteract potential dryness, leaving your skin feeling balanced and cared for. These thoughtful additions show a brand cares about your skin's long-term health, not just a quick exfoliation fix.
Finding your perfect peel is a personal journey. The right product won't just improve your skin's appearance; it will make you feel confident and in control of your own skincare ritual.
If you're curious to learn more about the science behind how these treatments work on a cellular level, you might enjoy our guide that explains in detail https://www.youthful-revival.co.uk/post/what-is-chemical-peel-treatment-discover-its-benefits. This can give you even more confidence as you select your first product.
How to Prepare Your Skin for a Flawless Peel
Think of a successful glycolic acid peel at home like baking a beautiful cake—the final result depends entirely on the preparation. What you do in the days leading up to your peel is just as crucial as the peel itself. This pre-peel checklist is your key to getting that incredible glow safely, without any unwelcome surprises.
Your journey to a flawless peel really starts about a week beforehand. This is your cue to gently dial back your usual routine and give your skin a bit of a rest. The single most important thing you can do is to pause any other strong, active ingredients.
Your Pre-Peel Skincare Pause
Imagine your skin is a canvas. Before you apply a vibrant new colour, you need to ensure it's calm, prepped, and ready. Piling on potent ingredients right up until peel day can seriously over-sensitise your skin, which can lead to a much stronger, more unpredictable reaction than you bargained for. Trust me, it's not worth it.
Here’s a quick list of what to temporarily set aside for at least 5-7 days before your peel:
Retinoids: This means everything from prescription tretinoin to your favourite over-the-counter retinol. They already speed up cell turnover, so combining them with a peel is a recipe for irritation.
Other Exfoliating Acids: Put away any other AHAs (like lactic or mandelic acid) and BHAs (salicylic acid). You simply don't want to double-exfoliate and risk compromising your precious skin barrier.
Physical Scrubs: Steer clear of any harsh facial scrubs or brushes. These can create tiny micro-tears on the skin's surface, leaving it vulnerable. To dive deeper into this, you can explore our detailed advice on how to exfoliate properly for radiant skin.
My Personal Tip: During this pre-peel week, I switch to a simple, comforting routine. I'm talking a gentle, milky cleanser, a hydrating serum packed with hyaluronic acid, and a basic, soothing moisturiser. It's all about nurturing your skin so it's in the best possible shape for the treatment ahead.
The Non-Negotiable Patch Test
If you take only one piece of advice from this entire guide, let it be this: always, always perform a patch test. This is your non-negotiable safety net. I know how tempting it is to jump right in when you're excited, but honestly, it’s the only real way to know how your unique skin is going to react.
The rise in at-home treatments has been fantastic, but it also shines a light on the need for caution. In the UK, reports of adverse reactions from at-home peels actually rose by 18% between 2022 and 2024, often because people skipped this one crucial step. The good news is that educational efforts have helped reduce these incidents among repeat users, proving that a little knowledge makes all the difference. You can read the full research about these findings.
Here’s exactly how to do it right:
Choose a Discreet Spot: Dab a tiny amount of the peel product onto a small, out-of-the-way area, like just behind your ear or on the inside of your arm.
Follow the Instructions: Leave it on for the same amount of time you plan to for your full facial peel. Then, rinse or neutralise it precisely as the product directs.
Wait and Watch: Patience is everything here. You need to give it at least 24-48 hours. Keep an eye out for any signs of extreme redness, blistering, swelling, or severe itching. A little tingle is normal; a major reaction is not.
If your skin looks calm and happy after that waiting period, you're ready to go. You can proceed with total confidence, knowing you’ve done your homework for a beautiful, irritation-free result.
The At-Home Glycolic Peel Ritual, Step by Step
This is where a simple skincare step becomes an empowering, luxurious ritual. Let’s walk through the entire process of your glycolic acid peel at home, transforming it from something purely clinical into a genuine act of self-care. I'll share the kind of practical, real-world insights you won't find on the box, so you can feel completely confident from start to finish.
Think of this as your quiet, dedicated time to connect with your skin. Set the mood. Maybe light a candle, put on some calming music, and lay out your tools like a pro. You’ll need your peel, a gentle cleanser, a soft flannel, a timer, and your post-peel soothing products all within reach.
Setting the Stage for Success
Before the peel even touches your skin, a few simple preparations can make all the difference between a good result and a great one. The lead-up is just as important as the application itself, as this visual guide shows.
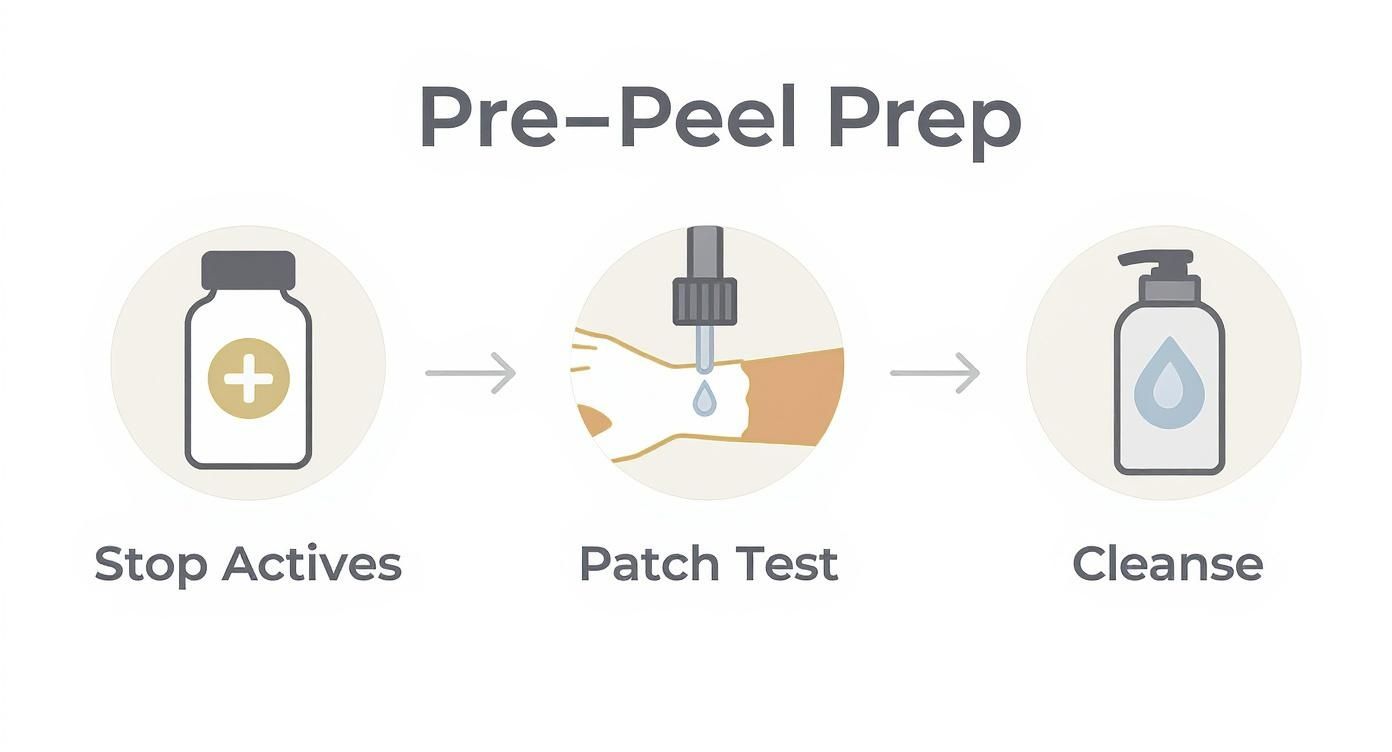
This straightforward flow—pausing other strong products, doing a patch test, and then cleansing thoroughly—creates the perfect canvas for your peel to work its magic safely and effectively.
Now, with your skin prepped and your sanctuary ready, it’s time to begin. Make sure your face is completely dry. Any lingering dampness can cause the acid to penetrate more intensely and unevenly, which is something we definitely want to avoid.
Application and Timing Your Peel
Using a clean fan brush or just your fingertips, smooth a thin, even layer of the glycolic acid solution across your face. I always find it best to start with the less sensitive areas first—like your forehead, cheeks, and chin—before moving to more delicate spots like around your nose. Steer well clear of the immediate eye area, your lips, and the corners of your nostrils.
Now, set that timer. This is absolutely crucial, especially for your first time. I always recommend starting with a very short duration, perhaps just 60-90 seconds, even if the bottle suggests a few minutes. You can always build up the time as your skin gets more accustomed to the process in future sessions.
That tingling feeling? It’s completely normal. Think of it as the acid getting to work, gently dissolving the bonds holding those dull, dead cells to the surface. However, if that tingle ever escalates to a painful, burning sensation, that's your skin's clear signal to neutralise and rinse immediately. Don't try to be a hero and push through pain.
The Final Steps: Neutralising and Rinsing
Once your timer chimes, it's time to stop the acid's activity. Some at-home peels are self-neutralising, but many require a separate neutralising solution. This is often a simple mix of bicarbonate of soda and water, though some kits provide one. If not, a thorough rinse with cool water is key. Just be sure to follow your product’s specific instructions to the letter.
After applying the neutraliser or starting your rinse, splash your face with cool water for at least a full minute. You want to be certain every last trace of the product is gone. Gently pat your skin dry with a clean, soft towel—no rubbing!
Your skin will likely look a little flushed and feel warm, which is a normal and expected response. It’s a sign that you’ve successfully kicked off that cell renewal process. Now, your fresh, receptive skin is perfectly prepped for the soothing, nourishing aftercare that follows.
Mastering Post-Peel Aftercare for Lasting Radiance
The real magic of your glycolic acid peel at home doesn't happen during the application—it unfolds in the hours and days that follow. What you do next is every bit as crucial as the peel itself. Your skin is now in a delicate, highly receptive state, and nurturing it correctly will lock in that beautiful glow you’ve just worked so hard to reveal.
Think of your skin as a newly polished surface; it’s smooth and bright but also incredibly vulnerable. Your game plan now is simple: protect, hydrate, and soothe. This is absolutely not the time to reach for more active ingredients or harsh treatments. Instead, it’s about embracing a gentle, healing routine that supports your skin's natural recovery process.
Your Immediate Post-Peel Soothing Routine
For the first 24-48 hours, your skin has two primary needs: hydration and calm. It might feel a bit tight or look slightly pink, which is completely normal. Your job is to baby it, feeding it ingredients that replenish and strengthen.
Focus on a simple, comforting skincare menu. This is where ingredients like ceramides, hyaluronic acid, and niacinamide become your absolute best friends. They work together to rebuild your skin's protective barrier, flood it with essential moisture, and dial down any redness, creating the perfect environment for healing.
All you really need is a gentle, creamy cleanser, a deeply hydrating serum, and a rich, barrier-repairing moisturiser. Simplicity is your secret weapon for success here.
The post-peel period is a dialogue with your skin. Listen carefully. If it feels tight, give it more moisture. If it looks red, give it calming ingredients. This intuitive approach will deliver the best results.
The Must-Dos and Definite Don'ts
Navigating aftercare is actually quite straightforward once you know the rules of the road. Following these simple guidelines will ensure your skin recovers beautifully, letting you enjoy the maximum benefit from your peel.
Your Post-Peel Checklist (The Must-Dos):
Sunscreen is Non-Negotiable: Your fresh, new skin is incredibly susceptible to sun damage. You must apply a broad-spectrum SPF of 30 or higher every single morning, without fail. Reapply if you're spending time outdoors. This is the single most critical step to protect your results.
Hydrate, Hydrate, Hydrate: Drink plenty of water and layer on hydrating skincare products. Think of it as providing your skin with the raw materials it needs to regenerate and thrive.
Be Gentle: Use only your fingertips to apply products, and gently pat your skin dry with a soft, clean towel. No rubbing, tugging, or harsh movements.
What to Avoid (The Definite Don'ts):
No Other Exfoliants: For at least a week, steer clear of all other AHAs, BHAs, retinoids, and physical scrubs. Your skin has just been deeply exfoliated; it doesn't need any more.
Pause Intense Workouts: For the first 24-48 hours, skip any activity that causes excessive sweating. Sweat can cause stinging and irritation on sensitised skin.
Avoid Heat: Stay away from saunas, steam rooms, and very hot showers. The heat can increase inflammation and make any redness worse.
If you ever feel like you've pushed your skin a bit too far, knowing how to repair a damaged skin barrier is essential knowledge for any true skincare enthusiast.
Reading Your Skin's Signals
It's vital to learn the difference between a normal, healthy response and a sign that something is wrong. Mild pinkness, a feeling of tightness, and even some light, flaky peeling a few days later are all positive signs that the peel is doing its job.
However, if you experience intense, persistent burning, significant swelling, or any blistering, those are red flags. Should this happen, strip your routine back to the most basic, soothing products possible and contact a dermatologist if it doesn't calm down quickly.
By mastering this aftercare, you ensure every peel you do is a confident step toward your most radiant self.
A Few Final Words Before You Begin
It's completely normal to have a few questions swirling around, even after a deep dive into the process. Let's think of this as a final chat, a chance to clear up any of those last-minute "what ifs" before you start this amazing journey for your skin. My hope is that you'll walk away from this feeling excited and truly confident.
We've covered the A-to-Z of choosing, prepping, applying, and caring for your skin post-peel. But experience tells me a few common questions always pop up. Let’s tackle them now, so you can go forward with complete peace of mind.
How Often Can I Really Do a Glycolic Peel at Home?
This is where you learn to become a true skin detective. The honest answer? It really depends on the strength of the peel you're using and how your own skin decides to react.
If you're starting with a gentle peel, something under 10%, you could probably begin with a treatment every two weeks. Pay close attention to how your skin responds. If it seems happy and bounces back quickly, you might even work up to a weekly glow-up. For anything stronger, though, it's far wiser to think of it as a special monthly reset.
The golden rule is simply to watch and listen. Lingering pinkness or a touch of sensitivity is your skin's way of saying, "I need a bit more time to recover, please!" Pushing your skin too hard is counterproductive and can damage its protective barrier—the very thing we want to support.
What if My Skin Reacts Badly?
First thing's first: take a deep breath and don't panic. If you feel any intense burning, see significant swelling, or experience anything that just feels wrong during the peel, it’s time to act swiftly.
Get to a sink and rinse the area with plenty of cool water for a few minutes. You need to be sure every last bit of the acid is neutralised and washed away. Afterwards, a cold compress can be wonderfully soothing and help take down that initial angry inflammation. Then, it's time to baby your skin.
Strip your routine right back to the bare essentials. We're talking:
A simple, soothing, fragrance-free barrier cream.
Pure aloe vera gel can also be a godsend.
Steer clear of all other active ingredients until your skin is back to its happy self.
Keep your face out of the sun and avoid makeup until the irritation has completely gone. If things don't get much better in a day or two, it’s time to call a doctor. This whole scenario is the number one reason why we never, ever skip the patch test. It’s your safety net.
Responding calmly and quickly isn't a sign of failure—it's the mark of someone who is smart and in tune with their skin's needs.
Can I Try This if My Skin is Sensitive or Prone to Breakouts?
Yes, you absolutely can—but you have to approach it with a little extra caution and a lot of respect for your skin's current state. For those with acne-prone skin, an at-home glycolic peel can work wonders on clogged pores and the stubborn marks left behind by old blemishes. The crucial thing to remember is to never, ever apply a peel over active, sore, or broken-out skin. Wait for it to heal first.
If your skin is on the sensitive side, your new mantra is "start low and go slow." I mean it. Begin with the lowest strength you can find, maybe around 5%, and leave it on for a ridiculously short time. For your very first go, 60 seconds might be more than enough. It's also a great idea to look for formulas that include calming, buffering ingredients like chamomile or cucumber. Frankly, if your skin is very reactive, you might be better off starting your acid journey with a gentler soul, like lactic acid, before graduating to glycolic.
Ready to start your journey towards a brighter, more refreshed complexion? At YOUTHFUL REVIVAL, we believe in empowering you with the knowledge and treatments to feel your absolute best. Explore our bespoke skincare solutions and start revealing your inner radiance today. Find out more at YOUTHFUL REVIVAL.
Comments